Here's the pic i'm going to start with:
Blah. Boring pic with boring sky. I cannot tolerate a boring sky, so i will switch to a cloudy sky, using filterstorm.
Once the photo is loaded into filterstorm, i will hit the button that looks like the sun and scroll down to the bottom and select double exposure.
i select my second photo and it takes me to this screen, where i can adjust the size of the images in relation to each other. i just want them the same, so i will select "fit exposure to image". if i wanted them different sizes, i would adjust them the way i wanted and then hit the paint brush tool instead. First, though, I have to select the blend mode by hitting the slide bars above the paint brush.
We'll talk about the different blending modes in another blog, for now we're just going to use normal, which means that the parts i select will simply be replaced by the second image with no blending or effects.
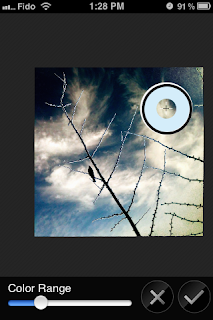
Now you will select the plus sign inside the circle and the fun begins!
Any colour that you set the tool over will be replaced by the 2nd photo. Voila! here is the boring sky replaced with clouds.
OR, if i wanted, i could replace the black branches...the possibilities are endless! (well, not in this photo - that's about it!)
Now, i want to get rid of these rough edges, so i select the paintbrush tool. I prefer to have the softness all the way up, the opacity around 50% and the diameter depends what i am doing.
I paint away the rough bits and i'm done! Well, not done for me, but it COULD be. You can use this tool for all sorts of selective adjustments - to blur all parts of the pic that are one colour, to change one colour to another, to selectively brighten, darken, adjust contrast or white balance...it's very handy!
Hope this helps! Thanks for sticking with it to the end - here's a 10% discount code for wearagrams on my etsy store. Your own instagram photos in a pendant. You can wear them as a necklace, use them as a keyfob, pimp your pooch's collar...it's up to you! The code is: FSBLOG10
wearagrams by 80sgirlart on etsy


Really great Tracy!! I also love FilterStorm, but haven't used the double exposure technique yet. I will have to try it out soon! Thanks!
ReplyDeleteThanks for the lesson! This is great and I can't wait to try some new things I just learned!
ReplyDelete