Trying out something different this time. Let me know what you think - i appreciate your feedback (and be honest or else you might end up hearing my annoying voice for every blog in the future! To view my video blog, click HERE
Hope you like it!
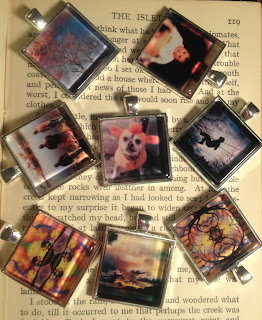
To order WEARAGRAMS, click HERE, because the best way to show off your instagram photos is to wear them!
Wednesday, December 21, 2011
Monday, December 12, 2011
This Week's CreativeCrew Challenge Prize
I'm pleased to offer one of my wearagrams pendants as this week's @creativecrew challenge prize (on instagram). The winner will recieve a beautiful silver pendant with the winning photo set under glass. Makes a great necklace, keychain or gift.
Wednesday, December 7, 2011
Layers part I - filterstorm
Anyone who follows me on instagram knows that i do a LOT of blending images and i get asked frequently how i do my edits. Filterstorm is one of my most used apps, but when i tell people that they usually say that they haven't been able to figure out how to use it! There are tutorial videos built in to the app which are very useful, but today i'm just going to tell you about the main feature that i love about filterstorm, which i call the "colour picker". i don't know what the correct name is, but this tool can save you a ton of time and trouble masking.
Here's the pic i'm going to start with:
Blah. Boring pic with boring sky. I cannot tolerate a boring sky, so i will switch to a cloudy sky, using filterstorm.
Once the photo is loaded into filterstorm, i will hit the button that looks like the sun and scroll down to the bottom and select double exposure.
i select my second photo and it takes me to this screen, where i can adjust the size of the images in relation to each other. i just want them the same, so i will select "fit exposure to image". if i wanted them different sizes, i would adjust them the way i wanted and then hit the paint brush tool instead. First, though, I have to select the blend mode by hitting the slide bars above the paint brush.
We'll talk about the different blending modes in another blog, for now we're just going to use normal, which means that the parts i select will simply be replaced by the second image with no blending or effects.
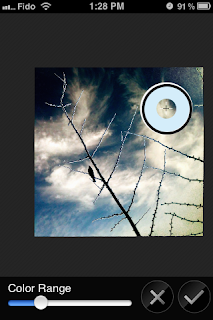
Now you will select the plus sign inside the circle and the fun begins!
Any colour that you set the tool over will be replaced by the 2nd photo. Voila! here is the boring sky replaced with clouds.
OR, if i wanted, i could replace the black branches...the possibilities are endless! (well, not in this photo - that's about it!)
Now, i want to get rid of these rough edges, so i select the paintbrush tool. I prefer to have the softness all the way up, the opacity around 50% and the diameter depends what i am doing.
I paint away the rough bits and i'm done! Well, not done for me, but it COULD be. You can use this tool for all sorts of selective adjustments - to blur all parts of the pic that are one colour, to change one colour to another, to selectively brighten, darken, adjust contrast or white balance...it's very handy!
Hope this helps! Thanks for sticking with it to the end - here's a 10% discount code for wearagrams on my etsy store. Your own instagram photos in a pendant. You can wear them as a necklace, use them as a keyfob, pimp your pooch's collar...it's up to you! The code is: FSBLOG10
wearagrams by 80sgirlart on etsy
Thursday, November 10, 2011
The secret of the 3D clouds
Recently, I have posted a couple of photos on instagram with clouds that looked almost 3 dimensional. I'm going to tell you how you can achieve this effect yourself.
First, you need a pic with some big, fluffy, contrasty clouds - if they are layered, that's even better. I can't help you with this part, you're just going to have to keep your eye on the sky and wait for the right day!
here's a good example:
notice how there is already some depth to these clouds as they recede into the distance - that's exactly what you want. This photo was processed using the clarity filter on camera+. I hate how grainy it looks, but i want all the shading and detail and i'll take care of the graininess later.
Next, you need to use an app that allows for selective blurring. I used big lens, but you could also do this with filterstorm or blur fx or any number of other apps, i'm sure. I like big lens because of the additional filters, which i will show you.
Once you've imported your photo into the app, you should choose "advanced" where you can start masking the area you want left sharp and unblurred.
you don't have to be super fussy here. the auto button can be quite handy if you are selecting something with strong edges - you can be really sloppy and hit auto and it will make the outline perfect. it is less useful for something like this, so you're just going to select some of the clouds and hit the arrow on the top right.
Now you can zoom in and out and adjust your focused and blurred areas. it's pretty intuitive - two finger pinch gestures to adjust the size, tap the focus or blur buttons to come up with a slider to adjust your brush size.
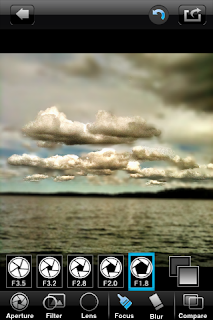
Once you've selected your focused areas, you can hit the aperture button to adjust the amount of blur. the lowest number is the most blurred, as in the example above. Now, you can hit the layers button to the right of the apertures to see if you like it better with a solid blur, like above or a graduated blur like the example below.
See how the water in the foreground is less blurred? I prefer this one, it gives some context and perspective and brings the focused clouds in closer.
Next, you can play with the different filters, and there are some pretty good ones here that will really make your focused areas pop. They are also all adjustable with a slider, which i like.
now, you can pick your lens. this will affect the shape of the bokeh in your blurred area. it won't really work with this photo, though because the bokeh is the light and in this case the lightest areas are focused. here are a couple of examples using a different photo.
As it happens, I prefer the colour of my original photo, so i'm going to stick with that. To finish off, i used filterstorm to increase my saturation and, most importantly, to remove the noise because i hate that graininess. Here's my finished product.
Tada! now it's your turn!
Check out 80sgirlart on etsy!
Sunday, November 6, 2011
storm coming
my photo, "storm coming" was accepted onto http://pixelsatanexhibition.com/! pretty cool, because you submit your work, but unlike other sites i've posted to, THEY decide whether your photo is worth posting or not.
Saturday, November 5, 2011
My latest idea for my etsy store
I'm pretty stoked about this! i'm planning to add a new listing to my etsy store: custom portraits. the customer can send me a photo of themselves, vintage photos of a loved one, pets, etc and i will blend them with my own collection of nature and vintage photos into an original, one of a kind artwork.
here's an example, a photo of me blended with a photo of my grandmother who i never met but think i resemble (no chin) and some flower pics.
The best part - no overhead for me, no risk for my customers. They can send me the photo(s) they want incorporated, i'll send them a couple of heavily watermarked possibilities, THEN they can pay for it and i'll email them the file without the watermark. oh, no shipping charges, either!
Monday, October 31, 2011
New line of Unchristmas cards in my etsy shop!
Celebrate this winter holiday season the way your ancestors did for thousands of years before
Christianity and consumerism co-opted the party. Imagine, the wine has fermented, the livestock has
been slaughtered, what can be put away to feed us through the long winter has been stored and now it's
time to eat and drink...for we won't all make it to spring.
This year, why not give a homemade gift instead of a mass produced one? Decorate a tree outside with
suet balls and cranberry strings for the birds and squirrels. Bear in mind that your time and attention
may be the most valuable gift you could give to a loved one.
Have a great winter solstice, brumalia festival, Hogmanay, festivus, mummer's day, saturnalia or pagan
good time of your choice!
http://www.etsy.com/listing/85055726/reusable-unchristmas-cards-set-of-3
Subscribe to:
Posts (Atom)


